Downhill Mountain Biking at Whistler: The First-Timer's Guide
Whistler is the best lift-served bike park in the world. It's also where a lot of first-timers have short, expensive, injury-filled weeks. Here's how to get it right.
Whistler Mountain Bike Park opened in 1999 and has been setting the global bar for lift-served mountain biking ever since. A Tuesday in July sees 4,000+ riders lapping 90 km of trails across three mountain faces, from bunny-green flow trails to the North American downhill circuit's toughest double black tracks. Your first week here is one of two experiences: the one you remember as the best riding week of your life, or the one that ends with a helicopter to Vancouver General.
The difference between those outcomes is almost entirely about trail selection, bike setup, and how many hours you ride each day. Most first-timers overestimate their park ability by 2-3 grades and run themselves into injury on day 3.
The Trail Grading System
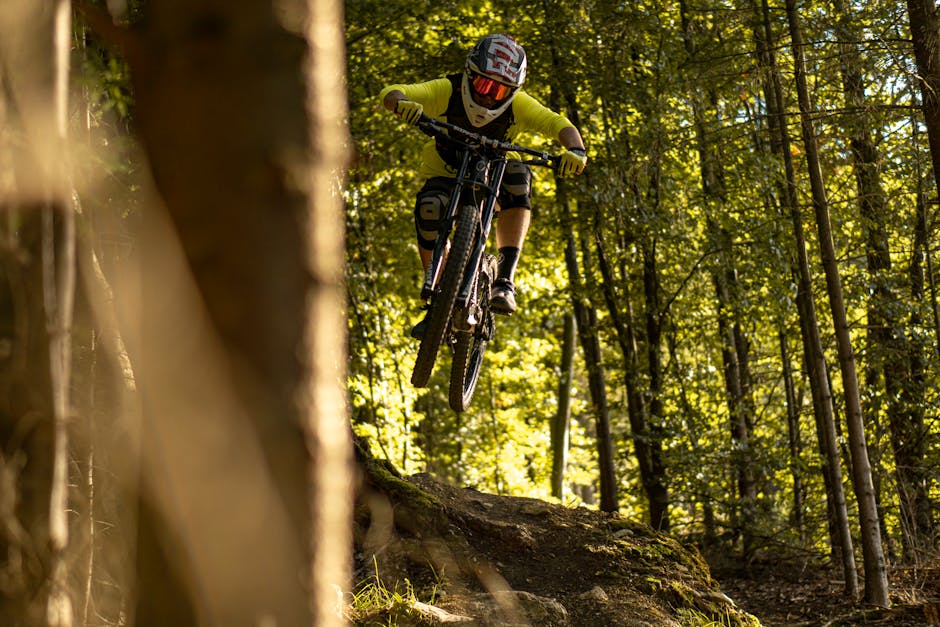
Whistler uses a grading system that should not be compared to your local trails. Trail grades here are harder than most North American trail grades.
- Green (easy) — wide, flow-oriented, gentle gradient. Ninja Cougar, Crank It Up, Easy Does It
- Blue (intermediate) — steeper, features optional, drops of 0.5-1m optional. B-Line, Heart of Darkness, Blue Velvet
- Black (advanced) — mandatory features, steeper terrain, drops of 1-2m. A-Line, Dirt Merchant, In Deep
- Double Black (expert) — large features, committed terrain, consequences for failure. Crabapple Hits, Detroit Rock City, Goat's Gully
- Pro Line — professional only. Don't ride these.
A first-timer who rides intermediate at their home mountain should plan to spend day 1 entirely on green trails, day 2 adding blue trails, and day 3 carefully sampling one or two easy black runs.
The Green Progression
Even within green trails there's a progression. Don't go straight to Crank It Up on day one — the table-tops on that trail, while all rollable, are intimidating to someone without park experience.
Day 1 morning: Easy Does It from the Lower Fitzsimmons lift. Roll the whole thing. Get your bike and braking dialled in.
Day 1 afternoon: Ninja Cougar. Introduces more features but still all optional and rollable.
Day 2 morning: Crank It Up. Now you're ready for the table-top rollers that define park flow trails.
Day 2 afternoon: move to B-Line if you're feeling good. B-Line is a blue trail but rides like a fast green — mellow features, room to breathe, good trail for linking park technique.
Bike and Gear
Rent a proper downhill bike for day 1. Even if you own an enduro bike. The full suspension, slacker geometry, and dual-crown fork of a rental Trek Session, Specialized Demo, or Santa Cruz V10 make the learning curve dramatically shorter.
Rental shops worth using: Whistler Village Sports (widest selection), Evolution (best service), Fanatyk Co (performance-oriented). Expect to pay $140-180 Canadian per day for top-tier rental plus insurance. The insurance is worth buying — crashing a $12,000 demo without insurance can cost you $3,000+.
Protection
Non-negotiable: full-face helmet (Bell Full-9, Fox Rampage Pro, Troy Lee Designs D4), knee pads, and gloves.
Strongly recommended: elbow pads, full-length shin guards for technical trails (7iDP Flex Lite), and a mouth guard for anything above blue.
Optional but wise: neck brace (Leatt DBX 5.5) if you're riding black trails. Chest/back protection on double blacks.
Eye protection: clear goggles in the morning/dust, dark goggles on the afternoon sun. Forgetting goggles is how you get a pine needle in your eye at 40 km/h and crash out of turn 3 on A-Line.
Footwear
Flat pedal shoes like Five Ten Freerider Pro or Specialized 2FO are what most park riders use. Clipless pedals have their advocates but for a first-time rider, flats are safer — you can put a foot down mid-turn without thinking.
Pacing the Day and the Week
The single biggest injury driver at Whistler: fatigue. The park is addictive and the lift efficiency is astonishing. You can easily lap 15,000 vertical metres of descent in a day. Most riders in their first week can't handle more than 7,000-10,000 metres before their technique falls apart.
Suggested week:
- Day 1: 4-5 hours on green trails, 6 laps max
- Day 2: 5-6 hours green/easy blue, 8-10 laps
- Day 3: 5-6 hours blue trails, 8-10 laps
- Day 4: Rest day. Ride a cross-country trail or take the gondola somewhere non-bike.
- Day 5: Push into black trails, half-day, 5-6 laps
- Day 6: Consolidation day, mix of blue and black, 8 laps
- Day 7: Favorite trails, no grade-pushing, full day
The rest day is where most first-timers fail. You'll feel fine on day 3. Day 4 you'll want to ride. Don't. Or do a mellow half-day on cross-country trails. Day 5 after a real rest is where real progress happens.
Lift Tickets
A 2026 season 1-day pass costs $139 Canadian. A 5-day pass $599. A 10-day pass $999. If you're riding more than 5 days in the season, the multi-day pricing pays off fast.
The Whistler Mountain Collective pass (if available in your region) bundles park days with ski season — it's the most cost-effective for anyone splitting seasons between lifts and snow.
Specific Trail Recommendations
Must-Ride Blues
- B-Line — smooth, flowy, great for building confidence on features
- Heart of Darkness — introduces jumping without excessive commitment
- Fade to Black — classic blue with roots and rocks, builds technical ability
Must-Ride Blacks (when ready)
- A-Line — the flagship jump trail. All table-tops, big but rollable with skill. The defining Whistler experience for intermediate riders.
- Dirt Merchant — rougher A-Line. Similar feel, smaller features, more rooty.
- In Deep — tech-oriented black in the Garbanzo Zone. Rooty, rocky, a test of skill.
Skip These on Your First Visit
- Crabapple Hits — the big jumps. World-class riders send these. You're not ready.
- Goat's Gully — steep, committing tech. Save for your second or third trip.
- Top of the World — not a bike trail. It's an alpine trail that happens to allow bikes in the afternoon. Do not mistake this for a downhill trail.
Lodging and Food
Stay in Whistler Village for the first trip. It's expensive ($250-400 CAD per night in summer) but the walking distance to the lift compensates for the cost. Creekside is cheaper and has its own separate lift system which gets less crowded.
Food: Whistler Village has a strong food scene. Peaked Pies for Australian pies, Bravo Tacos for quick, Purebread for bakery. Expect $25-35 per lunch at most Village spots.
Grocery: the Whistler Grocery Store in the Market Place is standard. Prices are high but selection is complete for self-catering.
Weather Contingency
Whistler rains. August has the most reliable dry weather. July is mixed. June can be wet and cool. September is beautiful but short-day.
Rain changes trails. Roots become slick. Wooden features become dangerous. On rain days, stay on hard-packed trails (Crank It Up, Easy Does It) and skip anything featured with wood.
After Whistler
A week at Whistler changes your home-mountain riding. Features you were nervous about look small. Speed that felt fast feels normal. Most riders return to their local trails riding 1-2 grades above their pre-Whistler level.
The cost is high — roughly $3,500-5,000 Canadian for a 7-day trip with accommodation, lift passes, rentals, and food. But it's the best bike-specific education money can buy. No skills clinic compresses progression like a week on good equipment at the world's best park.