Via ferrata - literally "iron way" in Italian - is a discipline that doesn't get the respect it deserves outside the Alps. In the Dolomites, via ferrate are a serious mountain sport, with grades from 1 (easy scrambling with steel cables) to 5 (overhanging mixed climbing with long exposed sections). The progression from beginner to advanced is well-documented, but few English-language resources explain how to approach it intelligently.
I've done via ferrate in the Dolomites, Austria, and Slovenia. The Italian grading system is the standard. Grade 1 routes are hikes with occasional fixed cables. Grade 5 routes require technical climbing ability plus all-day mountaineering endurance. Skipping grades is how people get hurt.
Grade 1 and 2: The Starting Point
Grade 1 via ferrate are simple. Cables run along exposed ridges or up steep terrain where unroped movement would be risky. You clip in with your ferrata lanyards (always both carabiners clipped for safety), and the cable guides you up. The physical difficulty is hiking, not climbing.
Good Grade 1 routes in the Dolomites: Alleghesi on Monte Pelmo, Sentiero delle Bocchette Alte in the Brenta Dolomites, and Via Ferrata Trincee on Cima Trincee. These are day-hike objectives with summit views that rival real alpine routes.
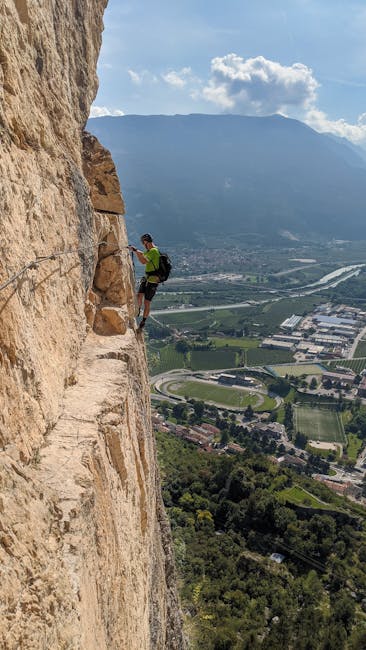
Grade 2 starts to include actual climbing moves. You'll use your hands on rock, you'll face brief vertical or overhanging sections (5-10 meters), and you'll need the lanyard system to hold your weight if you slip. Good starting Grade 2s: Cesare Piazetta on Monte Lagazuoi, Michielli Strobel on Pizzo Berchtesgaden, and Tridentina via Ferrata above the Val Gardena.
Essential Grade 1-2 gear
- Via ferrata kit (lanyard + shock absorber) - Edelrid, Camp, or Petzl, $80-120
- Climbing harness
- Helmet
- Via ferrata gloves (sharp cables scar hands)
- Solid approach shoes or light mountain boots
Grade 3: The Commitment Step
Grade 3 is where via ferrate become technical. Long sections of 70-90 degree climbing, exposed traverses over 200-400m drops, and route lengths that extend to 4-6 hours of continuous clipping. If you fall, the shock absorber in your lanyard will deploy, but you'll still take a hard fall of 2-4 meters.
The Delago Towers in the Rosengarten massif are iconic Grade 3 via ferrate. You climb the three main towers on protected ground with genuinely exposed traverses between summits. The day is long (8-10 hours), weather-sensitive, and requires commitment once you're on the harder section.
For people coming from rock climbing, Grade 3 might feel easy in terms of moves. The challenge is endurance and exposure. Even a fit climber gets tired after 5 hours of continuous lanyard management. Move efficiently, don't stop constantly, and pace your water intake.
Grade 4 and 5: Technical Climbing on Cables
Grade 4 and Grade 5 routes push into real climbing territory. The cables are still there, but you'll be on holds that wouldn't look out of place on a 5.7 rock route. Overhanging sections (15-30m) require upper body strength. Long exposed sections with no rest stances test your head game.
The Marino Bianchi via ferrata on the Civetta is a classic Grade 4. At 350m of climbing with sections in the Grade 5 range (overhanging ladders, 30m of iron rungs on a near-vertical wall), it's a real mountaineering day. You need 6-8 hours, you need to move through the hard sections without dawdling, and you need to be comfortable on sustained exposure.
Don't do Grade 4 or 5 routes as your first via ferrata. I've seen rock climbers (5.10 grade) try to shortcut the progression and get exhausted halfway up a Grade 4 because the cable work wasn't second nature. Via ferrate have their own rhythm.
Advanced Grade 4-5 picks
- Ivano Dibona - Tofana, technical Grade 3/4
- Marino Bianchi - Civetta, sustained Grade 4
- Dona Ferrata - Scimitar, bold Grade 5
Weather and Timing in the Dolomites
Dolomites weather is theatrical. Summer (June-August) gives you the best conditions, but afternoon thunderstorms are routine. The lightning risk on exposed iron via ferrate is real. Start early (first light), be off exposed sections by 1pm, and watch for building clouds.
In July I was on the Sentiero delle Bocchette when clouds built faster than we expected. We got down 30 minutes before the hail started. The guides at the Rifugio Pedrotti said we'd have been in serious trouble if we'd stayed up another hour. Respect the weather.
September is often the best month. Stable weather, cold mornings that freeze the tracks firm, and fewer crowds. The refuges are open into late September, which means you can do multi-day via ferrate linking refuges. This is one of the best ways to experience the Dolomites.
Safety Practices That Matter
Always clip both lanyards. I've watched climbers unclip one to save time on a traverse; this is exactly when they fall. The shock absorber system only works if both carabiners are attached.
Check your kit annually. The shock absorber deploys once and then needs replacement. If you've fallen even once and deployed the absorber, buy a new kit. The cost of $100 for a new kit is nothing compared to the cost of a non-deploying fall.
Never do via ferrate in thunderstorms. The entire route is metal cable. I don't need to explain this one.
The reward is real: access to mountain terrain that would otherwise require technical climbing. The Sass Pordoi summit, the Civetta ridge, the Brenta towers. Via ferrate are a way to move through serious mountains with reasonable safety margins. Just don't mistake that for total safety.